An interactive site for beginner photogaphers. Learn how a camera operates and how each setting plays a role in exposure.


An interactive site for beginner photogaphers. Learn how a camera operates and how each setting plays a role in exposure.
A camera lens takes all the light rays bouncing around and uses glass to redirect them to a single point, creating a sharp image. When all of those light rays meet back together on a digital camera sensor or a piece of film, they create a sharp image.

When light rays are forced through a small opening, they cross. When we see, the image is recorded on our retinas upside down as well — it’s up to our brain to flip it.
Light enters into the “dark chamber” through a small opening. We call
the size of this opening the aperture.
Apertures are measured in f-stops, with smaller numbers
meaning the opening is wider. Similar to the iris, when a room is dark an iris expands and when the room is bright the iris constricts.
However, there is more to aperture than just controlling the amount of light you need to take a well-exposed photograph. The chosen aperture value (or f-stop number, as it’s called) directly affects the depth of field in your image.
The lower your f-stop number, the shallower the depth of field. At f/2.8 for example, only a part of your object of interest will appear sharp. The rest of the photograph will be blurred.
If you want a great part of your image to appear sharp, though, you need to use a higher f-stop number like f/8 and above. An image shot with a small aperture should appear sharp all over.
The longer the film or sensor is exposed, the more light will be
in the final image. If there’s not enough time, the image will be
underexposed, if there’s too much time, the image will be
overexposed.
Shutter speed doesn't just control how long light is allowed to pass through the lens to your camera's sensor; it's also responsible for the appearance of motion in your photos.
Naturally, if you want to freeze the motion of a moving object, you need to use a shutter speed that's as fast or faster than whatever motion is occurring.
The measurement of how sensitive the film or sensor is. Lower numbers are less sensitive, higher numbers are more
sensitive. The lower the number, the more light you need to achieve a good exposure and vise versa.
Beyond simply changing the exposure, ISO also affects image quality. A higher ISO typically translates to a noisy or “grainy” image, just as a higher ISO film has more grain than one with a lower ISO. Keep in mind that the particular noise levels depend on the camera.
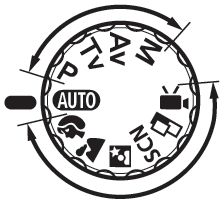
Manual (M) — user controls aperture and shutter speed
Aperture Priority (A or Av) — shutter speed set automatically
Shutter Priority (S or Tv) — aperture set automatically
Automatic (P) — camera controls aperture and shutter speed

Your camera will have an exposure meter that tells you if your image will come out underexposed, exposed well, or over exposed. Use this meter to determine if your settings need to be changed.

Sometimes you may want to override your camera’s opinion to get a better balance of light and dark in the image. For example, maybe the sky in the background is too bright and the flower you're adjusting for is correctly exposed on the meter. You would adjust the settings to under-expose the flower and worry about brightening the flower in post processing.
Read your camera's manual to know how to control the aperture, shutterspeed, and iso. Once figuring out your camera's controls, take time to shoot a few shots in your house or backyard testing out the controls.